Top Social

Picture Life

with embellishments...and rain drops!

Image Slider

Quick Quotes Blog

It's a Cupcake Kind of Day!

Thursday, January 29, 2015
Hello all my crafty friends! I'm happy to be here to share this birthday card with you today! Like I mentioned in my previous post, I have been playing with water-color lately so I did some experiments with this watercolor paper. This time I'm doing heat embossing with watercolor.

Here is the card of the day, yes I'm also fascinated with bright colors lately. ;) I heat-embossed the cupcakes images using JFF's Cupcake stamp in clear embossing powder then water-colored the cupcakes before filling up the background.


Products used:
- Just For Fun Stamps Cherry Confetti Cupcake
- Just For Fun Stamps ...Cupcake Kind of Day
- Strathmore Watercolor Paper
- Tim Holtz Distress Inks
- VersaMark Ink Pad
- CutCardStock Super Smooth Cougar White Card Stock

I absolutely love the sentiment although the stamped cupcakes in the background already says it all. JFF also has other cupcake stamps, check them out and you might just find your favorite! 

I want to thank you for taking your time to visit my blog today and I hope you like the card! Have a wonderful day!

Treat Bag Banner with Xyron!

Sunday, January 25, 2015
Hello all my crafty friends, thank you for checking in today! Valentine's day is about three weeks away and I've been making some projects to share with you. Today's is my first Valentine project this year, I made this fun treat bag banner using my favorite Xyron product - Xyron Mega Runner! I use my mega runners (yes! I have more than one, one for 1/2" adhesive and the other one for 1/4") in every of my projects since I bought them. I don't think I can survive without it. It's a life saver! Of course, it's not the only Xyron product I love. I love all their sticker maker machines too, what a genius invention they make my crafting journey so much easier and enjoyable! 

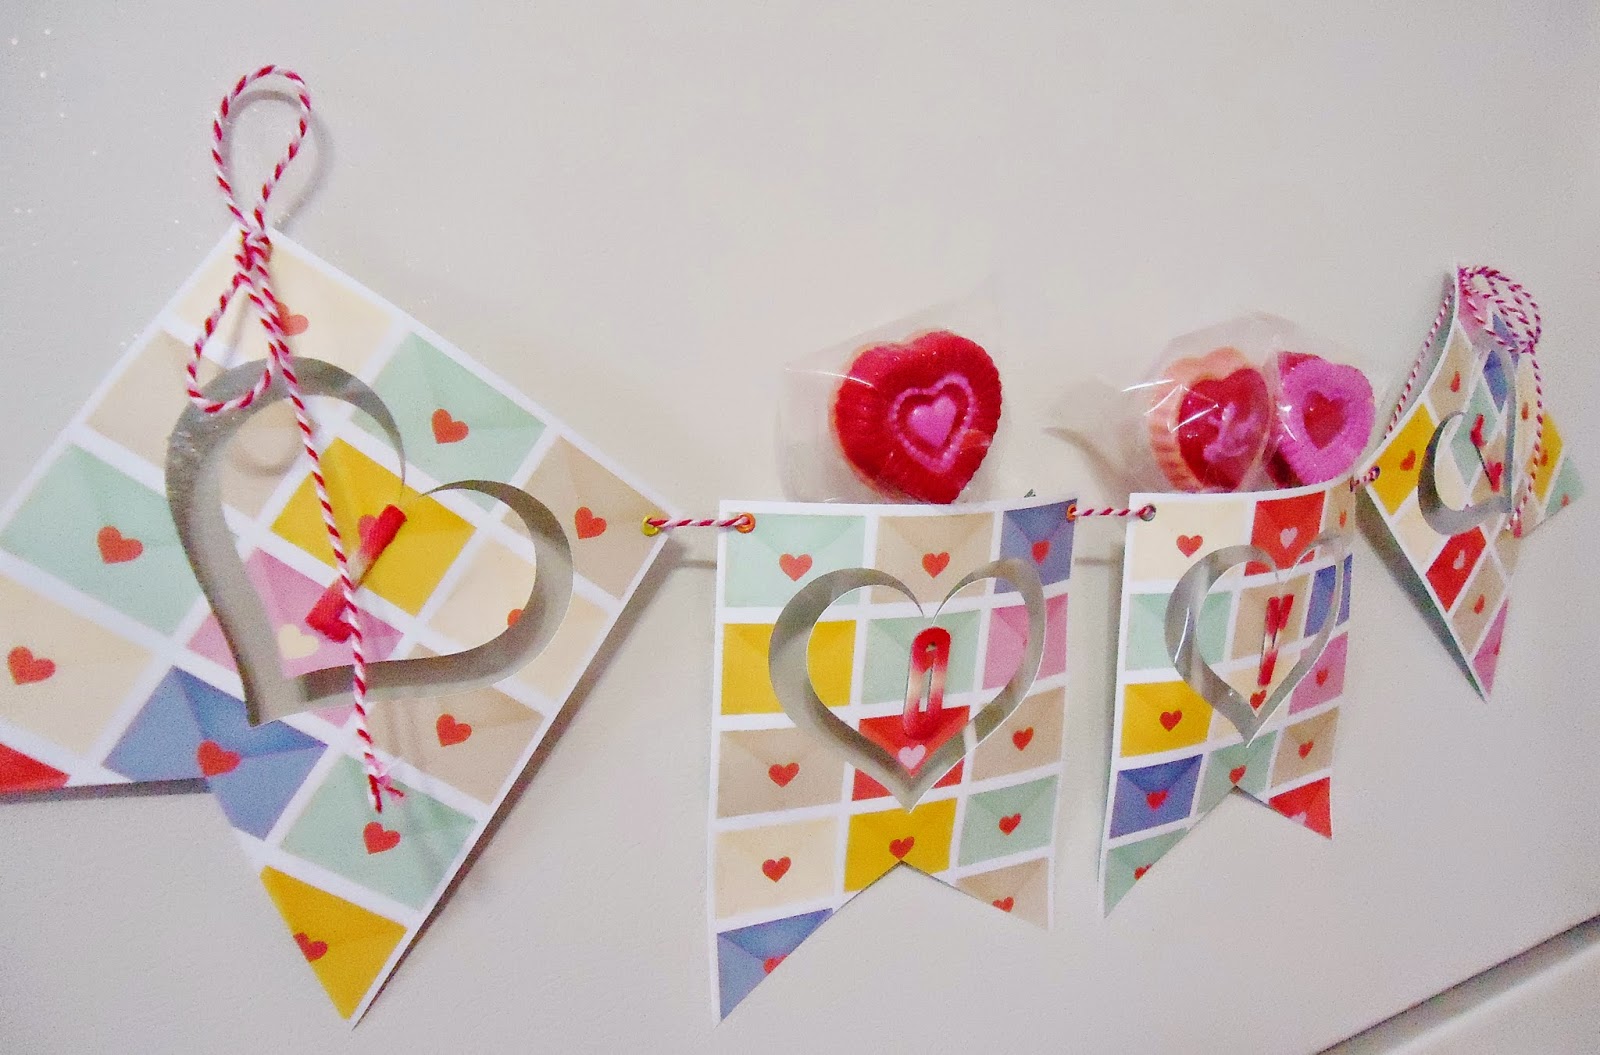
So here is the project of the day, a magnetic treat bag banner for my fridge! The kids are lucky, I made those lollipops myself too (well, with little help)! I have a tutorial for you too to make the banner if you are interested, and as always I will provide you the free cut file to create this (personal use only, thanks!).


Here is how it's made:

Step 1: Prepare a 12x12 card stock, preferably heavy card stocks. Download free cut file (at the bottom of this post) and cut the banners. Here is what you will get from the cutting. Note: Cut the center heart separately if you find the cut isn't perfect.


Step 2: Trim cellophane bags to the height of heart shape.


Step 3: Apply adhesive using Xyron Mega Runner and stick the cellophane bag from Step 2 on top of it.

Step 3: Run the cut-out heart shapes through Xyron Sticker Maker.


Step 4: Adhere the heart shapes from Step 3 on to the front of cellophane bags.


Step 5: Punch holes and apply eyelets on each banner.


Step 6: Using dauber, sponge red color on alphabet stickers (top and bottom only)

Step 7: Adhere alphabet stickers to the banner.


Step 8: Trim a ribbon or twine, string banners together. Apply magnets to the back of each banner. 

That's it! Fill the banner with your favorite treats!


Xyron Products Used:

Download Free Cut File: HERE

I hope you like this project, for those of you who have little kids at home this is going to be fun and kids going to love it! I had my son help me making the lollipops and he enjoyed it very much, especially eating it! lol. Have a crafty day, thank you for visiting my blog! 

You Are My Lucky Star Card

Friday, January 23, 2015
Hello all! It's TGIF and I'm here to share this water-colored card with you. I recently purchased some water color papers and I can't tell you how big of a difference it makes compared to using regular card stock for water coloring. I love this water color paper so much, it doesn't wrinkle when it dries and the color spread out beautifully. Of course, this card wouldn't be complete without Teresa Collins' cutting dies and Cut 'n' Boss! 

Now lets take a look at the card. 


I used Darice embossing folder with Cut 'n' Boss, the platform combination is A/B/A/Embossing Folder and Card Stock/D. Water-colored background using Tim Holtz distress inks.

Embossed patterns

Using Teresa Collins' cutting dies, cut out different sizes of star shapes and sentiments for the card.


Embellish the card with the cut-outs and here is what you will get!


 Craftwell Products Used:
- Craftwell Teresa Collins' Cut 'n' Boss
- Craftwell Teresa Collins' Lifestyle Collection Dies
- Craftwell Teresa Collins' Memory Collection Dies

I hope you like this card and it inspires you to create, thank you for joining me today! Have a super crafty day! - Alexia

Pillow Birthday Gift Box

Thursday, January 22, 2015
Happy Wednesday to all of you! I hope you are having a great day. This is Alexia here and today I want to share a project created using Kraft invitations with you. Before I start, just a remind to all of you don't forget to check the sale this week on Kraft card stocks. Grab the deal so you can make these pretty pillow gift boxes below! If you don't have a pillow box punch board then this is perfect for you because I will be providing you the tutorial and free cut file to create this project, please make sure the cut file is for personal use only.

You can make this gift box for all different occasions but today I'm making these for birthdays.


Tutorial Starts Here:

Step 1: Download the pillow box cut file at the bottom of this post. Cut it with your machine.


Followings are two examples of what you should get from Step 1.


Step 2: Fold along dotted lines. Apply double-sided adhesive on the closing flap on one side of the box.

Here is result from Step 2.

 Step 3: Close the openings on both sides of the pillow box after putting the gift inside.

Result from Step 3.


Step 4: Using circle punch, make some circles on patterned papers. Adhere to box with glue or adhesive dots.


Step 5: Trim a strip of ribbon and make a bow on the box horizontally. This should prevents item from falling out of the box. 

That's it! Simple? Remember you can always change the theme and use it for a different event! I hope you like the pillow box project I'm sharing today and don't forget to download the free cut file below! Have fun creating!

Download File Here: Pillow Box SVG File

CutCardStock Products Used:


Alexia

Rise When You Fail Card

Friday, January 16, 2015
Hi all, I hope you are having a good day! This is Alexia and I'm here to share a water-colored and stamped with beautiful JFF Stamps with you! I have been playing with water color lately so here is another water-colored card. I purchased some Strathmore water-color paper recently and I love the result very much. I used the cold press water color paper on this one, the paper has this bumpy texture to it that makes your project looks even better. 

So here is the card, I used the jumping girl silhouette stamp for this card and the sentiment is also from JFF! Love the sentiment, it's motivating. 


I colored the background with Tim Holtz distress inks.


JFF Stamps Used:

Thank you for visiting my post today, I hope you like the card and decide to give this water color paper a try (if you haven't already). Also, don't forget to get some JFF stamps, absolutely gorgeous designs for your projects!

Happy Birthday Treat Card/Holder

Hi all, Happy Thursday! I'm glad to be here today to share a project idea with you - I created this birthday card or holder that you can actually put treats in the card/holder. Lets see what I'm talking about here. I used chipboard for the base so the finish project won't be too fragile to hold the candies. Would you like to know how to create this? I'll share the tutorial with you below!


Tutorial Starts Here:

Step 1: Line up a 12x12 Chipboard on a scoring board and score at 5", 5 1/2" and 10 1/2". Then turn the chipboard around 45 degree counter clockwise and score at 7". Trim the excess, you will get a 5"x7" card with 1/2" in width.


Step 2: This is result the from Step 1. Use the die from Teresa Collins and run it through Cut 'n' Boss machine. Set aside cut-out.


Step 3: Choose a pattern paper, trace the window from inside of the card and cut a window as pictured below. Adhere the pattern paper to the card.


Step 4: Apply adhesive around the window on the inside of the card and adhere the candy bag (with opening side facing up).


Step 5: Now use the cut out from Step 2, adhere to the front of card (right on top of the candy bag).

Here is how it should looks like:

Step 6: Using the same patterned paper for the card, trim a piece that fit in the candy bag as shown below.


Step 7: Prepare embellishments using Teresa Collins' dies.


Step 8: Embellish card/holder! When you are done embellishing, insert candies into the bag, remember to seal the opening of the bag. Now this card/holder is ready to go out!


Craftwell Products Used:
- Craftwell Cut 'n' Boss (Teresa Collins) Machine
- Craftwell Teresa Collins Lifestyle Collection Dies
- Craftwell Teresa Collins Memory Collection Dies

I hope you like this project I'm sharing today, and have fun making it too! I'm sure you are going to bring joy to the one who receives this treat card/holder! Happy creating! Thank you for stopping by!

Auto Post Signature

Auto Post  Signature