Top Social

Picture Life

with embellishments...and rain drops!

Image Slider

Quick Quotes Blog

Xyron and Anna Griffin!!

Friday, September 26, 2014
Hello all! I want to share several projects which I created using Xyron and Anna Griffin's products today, I was so excited when I was told that I'll be working with Anna Griffin's products! So I decided to use these amazing products from both companies and transform a chipboard box into a beautiful birthday gift box. Now, who wouldn't want to receive this? :) Tutorial is provided to create this gift box, simply scroll down!

Wait!! Don't forget to check out other two projects I created, they are after the long-winded tutorial (keep scrolling!)


Tutorial starts here:

Step 1: You will need a chipboard box, I got mine from Michaels.

Step 2: Take a 12 x 12 Anna Griffin's patterned paper, trim two of  2-1/4" strips for the bottom part of the box

Step 3: Run the strips through Xyron 2.5" Sticker Maker

Step 4: Wrap around the holder part of the box, close and adhere the flaps 

Step 5: Cut a 4x4" square in same patterned paper (create sticker using Xyron 5" Sticker Maker) and adhere to the bottom of the box


Step 6: Repeat Step 2 - Step 5 but trim paper at 1-1/4" instead, wrap paper around the box cover. Cut a 4x4" square and adhere to the top of the cover.  


This shows the side of a completely wrapped box

Step 7: Trim a 4x4 flocked paper (you can actually omit the step to cover the top of the cover with a 4x4" patterned paper above), I did it because I only decided to cover it with flocked paper after that.


 Step 8: Use a hot gun, glue the lace around all edges of the top of the box


Step 9: Start embellishing!

Here is how the end result looks like, do you like it? :) 


Products used:
- Anna Griffin 12x12 Patterned Paper
- Anna Griffin 12x12 Flocked Paper
- Anna Griffin Layered Flower Embellishments
- Anna Griffin Title Sticker
- Xyron 2.5" Sticker Maker
- Xyron 5" Sticker Maker
- Xyron Mega Runner
- Xyron 3/8" Adhesive Dots
- Pink Blings
- Lace

Project No. 2 - Treasured Moments Layout 

Love love love all the embellishments from Anna Griffin (the layered die-cuts, borders, banners, etc), so beautiful and perfect for making this layout with my little girl on it. Her and her dark red mini version cheong sam, how cute? I bought that outfit for her in Singapore for Chinese New Year in January this year.


 It's like a little flower garden!


Products used:
- Anna Griffin 12x12 Flocked Card Stock
- Anna Griffin 12x12 Patterned Card Stock
- Anna Griffin Borders
- Anna Griffin Ephemera
- Anna Griffin Layered Flower Embellishments
- Anna Griffin Title Sticker
- Xyron 2.5" Sticker Maker
- Xyron 5" Sticker Maker
- Xyron Mega Runner
- Xyron 3/8" Adhesive Dots


Project No. 3 - Masculine Birthday Card

Last project - a happy birthday card! The embossed background image is a stamp from Anna Griffin. It gives the card such an elegant look, simple and quick to create too! 

 Shiny!


Products used:
- Anna Griffin Card Base
- Anna Griffin Stamp
- Anna Griffin Trimmed Card Stock Paper
- Anna Griffin Banners
- Anna Griffin Title Sticker
- Xyron Mega Runner

I hope you like all the projects I shared today, I appreciate you for taking time to stop by. 

Thank you, and have a great day!

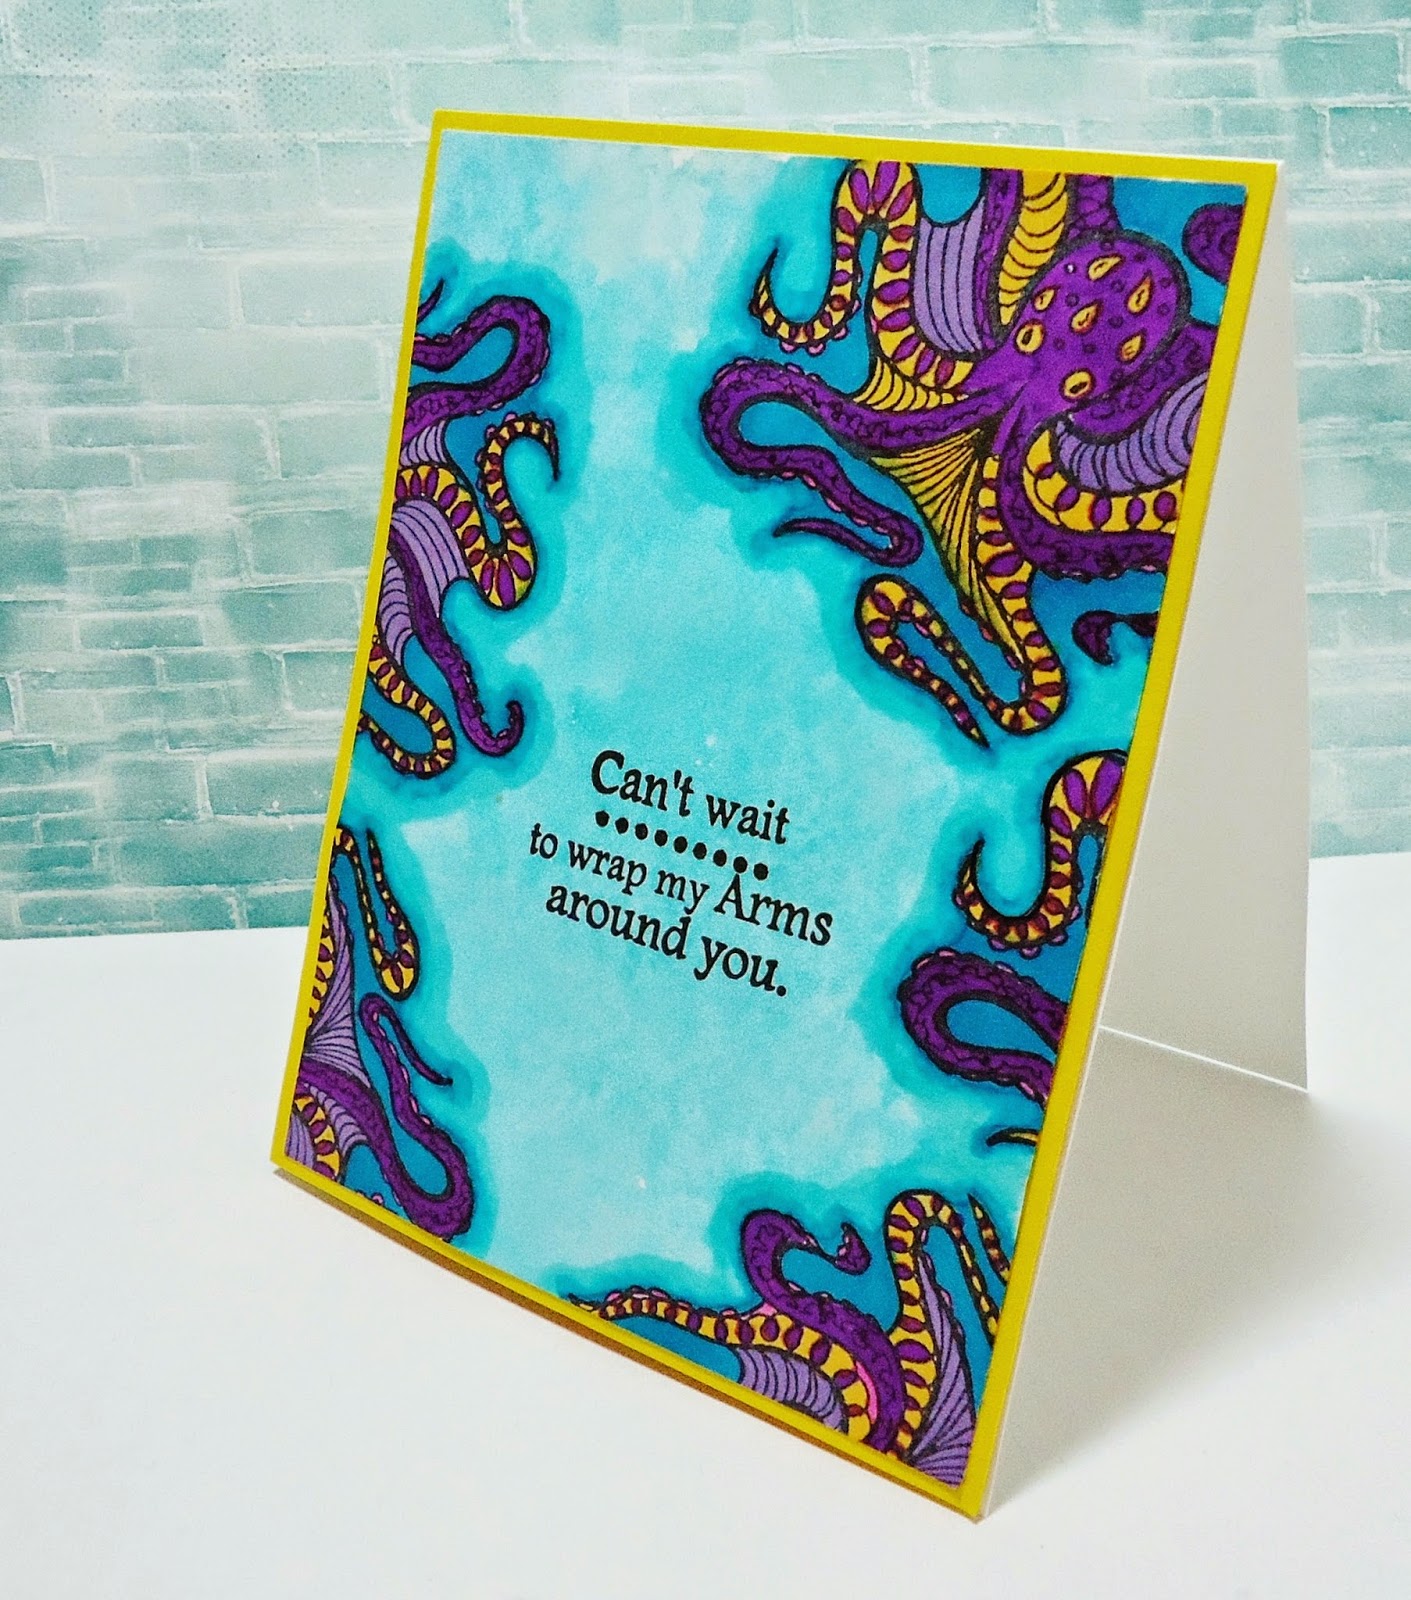
Can't Wait To Wrap My Arms Around You!

Wednesday, September 24, 2014
Hello everyone! It's my post for JFF Stamp week! Today I have this card I created using their StampTangle Octopus stamp and of course very perfect title stamp for this card. 

 
I stamped the octopus stamp around the card and colored them with alcohol markers.

The background is water-colored.

Front view of the card. 

Supplies and tools:
- Bazzil Basics Card Stock (Yellow)
- CutCardStock #100 Cougar White Card Stock
- Just For Fun StampTangle Octopus Stamp
- Just For Fun Wrap My Arms Around You Stamp
- Spectrum Noir Alcohol Markers
- Loew Cornell 36-Color Watercolor
- Momento Tuxedo Black Ink Pad
- VersaFine Onyx Black Ink Pad

I hope you you have a happy Wednesday! Thanks for looking. :)

Happy Thanksgiving Card

Friday, September 19, 2014
Hello there! I can't believe we are in the mid of September already, where has Summer gone?! With Autumn approaching (although it feels like it already) , I want to share a Thanksgiving card that I created using CutCardStock Card Stocks, I know....I can't believe I totally skipped Halloween! lol. Anyway, I hope this project gives you an idea of what to create or inspire you to create something else for this coming Thanksgiving! :)


Step 1: First you will need a couple of fall leave cut images, then you can make a new image from there by creating a frame with attached fall leave around it. Following is silhouette's designer software screen shots for illustration for this step.

Create a frame such as the above and make sure to select all and click "Make" from the "MODIFY" window


Place leaves around the frame, be sure each leaf touches the side (but not over) of the frame. In the same "MODIFY" window, click "Weld" and the following image will appear.


Cut three smaller leaves for decorating the card later


Step 2: Take a piece of gold Basis Card Stock that is slightly smaller than 4- 1/4" x 5- 1/2" in size, run it through a fall-themed embossing folder (I used Darice's)


Step 3: Using double-sided foam tape, place and adhere embossed card from Step 2 above behind the cut-out frame from Step 1. I find it easier if you stick foam tape behind brown card stock (around frame) instead of on the embossed gold card stock.


Step 4: Embellish some of the background leaves with some patterned cut-out fall leaves (smaller size to create the shadow effect), stamp sentiment. 


I hope you like this card and decide to make one too!


CutCardStock products used in this project:


DIY Fall Home Decor

Tuesday, September 16, 2014
Can you believe Autumn is around the corner? Regardless of how much I love summer,  I look forward for the weather to get a little cooler.  However, it's a little off this few days it got so cold it feels like winter. I have been feeling unwell due to the unstable weather, actually I have not been feeling better since the allergy I got from Spring. I saw doctor and turned out I was wrong, I thought the longer I have been in this country my immune system will be more used to pollens. No, it won't. It will only get worse. So I have to figure out what I'm going to do with myself next Spring, I don't really like taking pills, perhaps will try some acupuncture first.

Anyway...lets move on to the project I'm sharing today, a DIY home decor - fall flowers (artificial) pot that I made yesterday.


I got the square glass vase from flowers bought for me by my hubby 2 years ago, I saved it knowing that I could turn it into something, and I did although it only took 2 years. hehe. :) 


I got some fall flowers from Michaels and I trimmed the stem because it comes in a bunch.


This is how it looks like after putting in all the flowers

Trim to pieces of paper (if you use paper with width larger than 20" you will need only one long strip, since I used 12 x 12 I had to cut two of them) at 4 3/4" height (depending on the size of your vase)


Apply adhesive to the blank side with 5" Sticker Maker


Wrap around the vase (hot glue might be needed to close the edges)


 Adhere ribbons around the top and the bottom of the vase


This is how it looks like when it's done, no more waste of vase and you have a beautiful home decor!


Happy Autumn!

Products used in this project:
- A Square Glass Vase
- DCWV Autumn Melody Stack
- Celebrate It Ribbon
- Articifial Fall Flowers and Leaves
- Xyron 5" Sticker Maker
- Xyron 1.5" Sticker Maker
- Hot Glue


Thank you for stopping by, I hope you have a wonderful day. 

Recipe Stand

Monday, September 15, 2014
It's Alexia here today, hope your day has been great! Sharing with you today a recipe card stand that I made using Clear Scraps September Kit. This recipe card stand has two sides, one side to hold smaller size recipe card and the other side hold a bigger recipe card up to A4 size. 

Side view of the stand. I used the Clear Mini Word Album in the kit without using the word "Recipe" (which later I use in a different project). The bottom is a 4x4 Clear Acrylic Sheet.


This side of the stand holds bigger recipe card, background decoration with card stock stickers.


And this side holds smaller recipe card, the front is embellished with painted flowers and card stock stickers.


Example

Another example


Supplies:
- Clear Scraps September Kit (Includes Carta Bella Home Made With Love Card Stocks, Paper Flowers, Element Stickers, Clear Scraps 4x4 Clear Acrylic Album, 4x6 Mini Word Album, 4x6 Chipboard Album)
- Xyron Mega Runner
- Xyron Dot Adhesives
- Xyron 250 Sticker Maker
- Heidi Swapp Color Shine
- CANDi Dots Embellishments
- Foam Stickers
- Martha Stewart Border Punch

Hope you like this project! :) 

Thanks for looking!

Recipe Card Hanger + Fridge Magnet

Wednesday, September 10, 2014
Happy Wednesday to all! Sharing with you today is a Recipe Card Hanger + Fridge Magnet project. This actually was created for my DT work for Clear Scraps and Just For Fun Stamp so you can find my posts over there today as well. 

Wonderful colors of the card stocks are perfect for the background. The acrylic word "RECIPE" is from Clear Scraps mini word album. You can find them HERE if you are interested. The Stamp embossed on the flowers is from Just For Fun Rubber Stamps - Dragon Fly. For detailed products used, please see the end of this post. :)

Not only it keeps your recipe cards organized but it serves as a decoration for your fridge. :)


It comes with a cloth pin on top so you can access specific page of your recipe cards anytime, flip and pin!

Supplies used:
- Carta Bella Home Made With Love Collection Card Stocks and Stickers
- American Crafts Cloth Pin
- Inkadinkado Embossing Powder (White)
- File Rings
- Magnets
- Buttons
- Tim Holtz Distress Inks
- Eyelets
- Hemp Twine

Hope you like this recipe card hanger/fridge magnet. Thank you for stopping by and have a great day! :)

Fall Wagon Home Decor

Tuesday, September 9, 2014
Good morning! Just want to share a project I created for CutCardStock yesterday, if you missed it go ahead and visit their BLOG POST now for step-by-step instructions to create this cute little wagon. What's the fun part? The file is free for download!


CutCardStock products used in this project:


Other supplies:
- Xyron Mega Runner
- Xyron 2.5" Sticker Maker

Thank you for visiting and happy creating! :)

Auto Post Signature

Auto Post  Signature