Top Social

Picture Life

with embellishments...and rain drops!

Image Slider

Quick Quotes Blog

Birthday Paper Gift Bags

Friday, July 31, 2015
Hello all Craftwell fans! It's my turn to share a project with you today, I made the following birthday gift bags using 12x12 card stocks and bow embellishment from Craftwell's bow dies. You can never have too much gift bags in the house!


To make this cute gift bags, I first score a 12x12 card stock by following the guidelines as shown below

Rotate the card stock 90 degree to the left and score at 3 1/2" and 11 1/4"

Cut the access card stock as shown in the picture below

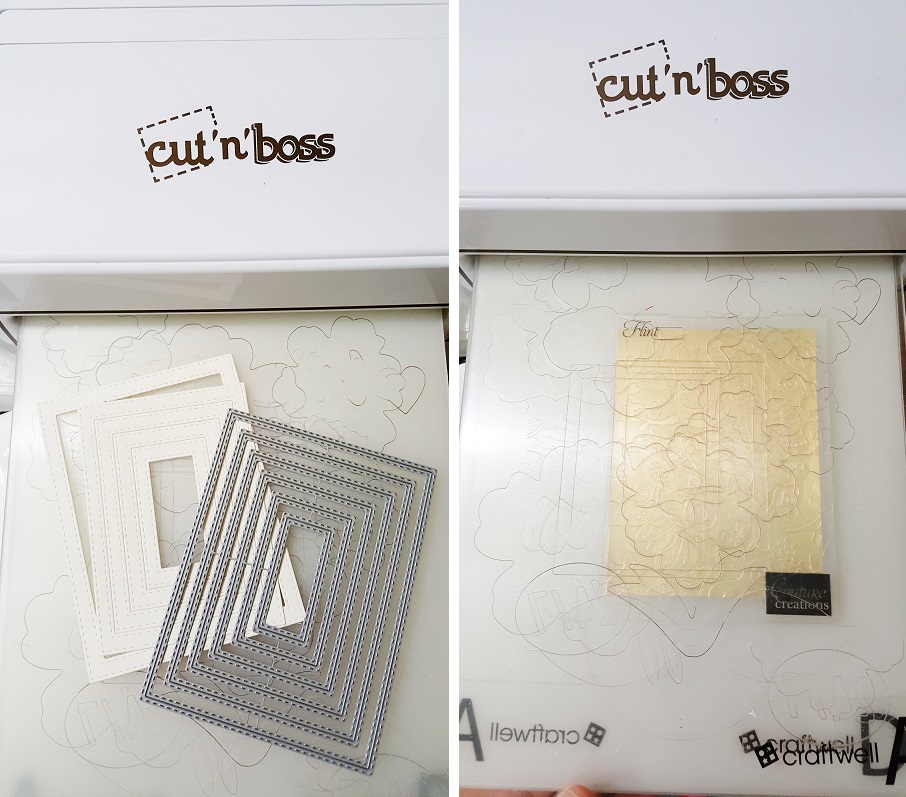
Emboss just the opening flap for the gift bag, run it through Cut 'n' Boss machine. I used Darice's star embossing folder here.

The combination for the platform is A/Cardstock + Embossing Folder/A/D

Here is how it looks like after embossing

Close and seal the bottom of the gift bag

Prepare the bow embellishments, love this bow dies so much! The platform combination for this would be A/Cardstock + Dies/A/B/D

Using ribbon to make the fastener for the gift bags, staple ribbon end to end and adhere the bow to the ribbon.

This is how it looks like, how do you like it?

Hope you like the DIY project I'm sharing today! Have a wonderful day!

Craftwell Products Used:

Other Products Used with Cut 'N' Boss:
- Darice Star Embossing Folder
- Darice Chevron Embossing Folder

Congratulations with Metallic Gold and Silver

Tuesday, July 28, 2015
Happy Monday to all my crafty friends! I hope you had a wonderful weekend and ready to start off the week with some crafty inspiration. This is Alexia and I'm here today to share a card I made with you with gold and silver card stocks!

This time I chose to use the gold and silver card stocks from Stardream collection (my last post was a garland made using gold and silver foil card stocks). I love the quality of the card stock very much and the fine gold card stock is very suitable for creating something elegant, such as the card I'm sharing today.


I don't have much tutorial to share for this project, but I can show you what card stocks I used to create this card.


I used the one of the doilies die from Couture Creation, which I think is great for making a double layered card. For the background, I chose to use the basis aqua card stock I think they all go pretty good together, what do you think?


I hope you like this card, don't forget the gold and silver card stocks are still on sale! You can never have too much of card stock. :) I hope you have a fantastic week and get lot of crafting done!

CutCardStock Products Used:

DIY Daily Planner

Friday, July 24, 2015
Hello all! Welcome to Craftwell's blog. It's Thursday which means it's my turn to share with you project ideas here today. Even though the school only starts in September, I think it would be great to get ahead of time and made this daily planner for myself before the kids start going back to school.

As we know the gold color is in trend recently so I incorporated this gold foil color on my daily planner's cover! It sure is shiny! 


To make this cute daily planner I first prepare two 4 3/4 x 6 chipboard card stocks to be used as the front and back covers for the planner. I then chose a stencil and apply modeling paste over it (only the surrounding).


While waiting for the modeling paste to dry, I die-cut the frame using My Favorite Things' stitched frame dies with Cut 'n' Boss . Also I emboss a gold foil card stock with embossing folder from Couture Creations. After you completed this step check your modeling paste to see if it's dry, air-brush it with pink distress ink if it is (with the same stencil pattern as the mask).

Here is the embossed gold foil card stock, isn't it beautiful? Prepare few same size card stocks in different colors as the page divider and die-cut the tabs using Teresa Collins' tab die. Glue the tabs to the card stocks and label them. Using double-sided foam tape, adhere the embossed gold card stock behind the stitched frame and glue the two on to the cover with stencil pattern.


Start embellishing! More fun die-cutting!


Decorating the inside page!


Look at those tabs with the name of each seven days, I love it! Can't wait to start using it. :)

And this SPARKLE page, so yummy looking!


I love the little trinket string bookmark too. I have to start filling up the page now because I can't wait any longer. hehe. Thank you for visiting my post today, I hope you like the project! Happy Crafty Day!!

Craftwell Products Used:

Other Products Used with Cut 'n' Boss:
- My Favorite Things' Stitched Frame Dies
- Couture Creations' Embossing Folder

SOULMATE Garland

Tuesday, July 14, 2015
Hi all crafty friends! Can't believe how time flies, it's July already. And if you are looking for wedding project inspiration, I have this project to share with you today. It's a garland with the word "SOULMATE" made with gold and foil cardstocks from CutCardStock. I think it's perfect to hang this on the wall at the wedding reception or the wedding hall, what do you think? 

The gold and silver foil cardstocks are shiny and beautiful and it definitely catches the attention of the crowd.


To create this garland I first design and cut the heart shapes using my Cameo cutting machine


Then cut the same size heart shape on a heavy white cardstocks, this is for the background layer for the gold-color heart shapes.

Before adhering the white cardstock to the back of the gold foil hearts, punch holes so you can insert the string for the garland later.


Apply double-sided foam tapes and stick the both hearts together

Lastly, string ribbon to the holes to form a garland

NOTE: I also cut out smaller size heart shapes with silver foil card stocks and decorate them around the finished garland from above.


I hope you like the garland project! Have a fantastic day!

CutCardStock Products Used:

BEE Yourself, Mi Amore

Monday, July 13, 2015
Hello wonderful YOU! I made this two cards to share with you today, the first one was a card I created for Bella Blvd, Craftwell and Tombow blog hop last month. I was representing team Craftwell and they gave out really amazing prize for the hop - their airbrush system!! Excited for you if you were one of the lucky ones! 

The second one was some random card I made using the stencil from Momenta (my very first design team I had joined years back). Hope you like them! 


LOVE {HEART} Banner

Friday, July 10, 2015
Hello all! I hope your day has been treating you well! Thank you for checking out my post today, I have this cute little banner project I want to share with you! I absolutely love the patterned papers and the 12x12 acetate sheet from Bella Blvd, they are so beautiful. Of course, this project wouldn't be perfect without Craftwell's elements and if you are into cut-out sentiments/titles, the Teresa Collins' die collections are the definite go-to product.


Here is how I create this banner:

Step 1: Trace a heart share on a 12x12 (scallop-edged) acetate sheet from Bella Blvd.

Step 2: Cut out the heart shapes using a scissor.


 Step 3: Trace the cut out heart shape on 12x12 patterned card stock.

Step 4: Cut out the heart shape and adhere the cut-out acetate on top of the card stock hearts. I used my 5" sticker maker to do this.


Step 5: Cut out the embellishments from Teresa Collins' metal dies and start embellishing.

Step 6: Punch holes for string for the banner and attach bows in between each decorated heart shape. 


I hope you enjoy this project! Thank you for looking and I hope you have a wonderful day. 

Products Used:

Auto Post Signature

Auto Post  Signature