Top Social

Picture Life

with embellishments...and rain drops!

Image Slider

Quick Quotes Blog

Thinking of You Card with DA Card Kit

Thursday, March 31, 2016
Check another card using Downtown Abbey Card Kit by Crafter's Companion! It's available on HSN now, grab the deal before it's gone! You can make at least 50 cards with this kit and that's less than $1 per card, it's definitely more reasonable than a pre-made card sold in store. The awesome part is you get to put together the card the way you want it. 

This is just one of the cards I created using the kit, the possibilities are endless. For more ideas to create with this kit, simply visit Crafter's Companion FB for more project inspirations! 


I'll be back to share more with you!! Stay tune...!

So Very Blessed Card

Tuesday, March 29, 2016
Made this using Heidi Swapp's stencil that I bought a long time ago but never had the chance to use it. So is the cross-stitch die from My Favorite Things. Finally opened the package yesterday and made this Spring card. This is not for any of the design teams I'm on, just a random card. One of these days I really need to make time to create with all the unopened supplies in my stash. 

Loving the color combo of this card, teal is always my favorite color. It goes very well with many other colors such as pink, green, orange, yellow, grey and black. I sprayed the color shine once and let it dry before I overlapped the same stencil on the sprayed image (slightly off) to create a shadow look.

Just want to let you know that I'm very blessed to have you following my blog! Thanks for checking out my blog post and I hope you have a wonderful day!

Products Used: 
- My Favorite Things Stitched Die
- My Favorite Things Cross-Stitch Die
- Heidi Swapp Triangular Stencil
- Heidi Swapp Color Shine
- Simple Stories Ephemera 

AquaBlend Watercolor Pencil Spring Card

Monday, March 28, 2016
Sharing another card using AquaBlend Watercolor pencils today to welcome Spring. The watercolor pencils are very easy to control and create beautiful water colored image. 

Products:
- Sheena's A Little Bit Scenic - Provence


Tips: You can use color straight off the tip of the watercolor pencils if you need to darken the color of your image. You don't need to wait for the image to dry to apply another layer of color. 

I hope you like this card! These watercolor pencils are really impressive, I love the watercolor look and how smooth and even the colored image when it dries. 

Love You More Everyday Layout

Wednesday, March 23, 2016
I don't usually do scrapbook but once in awhile I encourage myself to create some for the sake of keeping track my children's growing-up process. I chose to make this Spring themed layout with my daughter's picture. 


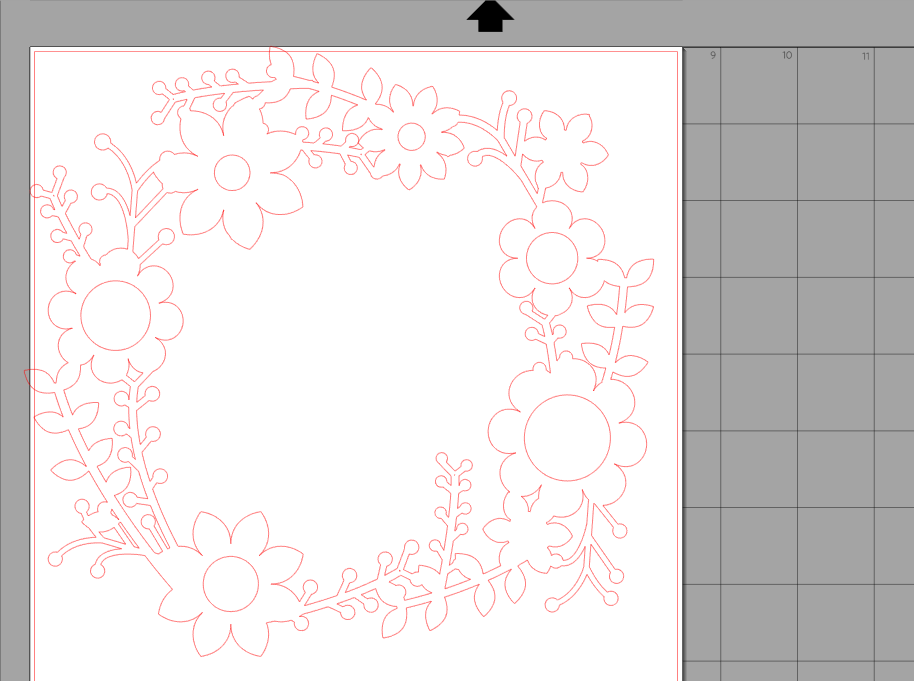
Step 1: Cut the floral background using Cameo, this design can be found on Silhouette online store. Curious Metallic card stock is used.


Step 2: Color the negative from the die-cut with Spectrum Noir Alcohol Markers then fit the puzzle back together in the main die-cut floral frame. Use regular tapes to connect all edges together.

Do the same to the circle cut-outs from the floral frame (coloring with alcohol marker) and adhere them on a 12 x 12 patterned card stock of your choosing, Make sure to line up with the original die-cut so you know where exactly to stick the circles. This is to create a pop-up effect by adhering the floral frame die-cut using double-sided foam tapes later.

Step 3: Apply double-sided foam tapes on the die-cut from Step 2 and layer/stick over the pink circles. 

Here is how it looks like, you can see the three dimensional effect. 

Step 4: Die-cut the picture using circle die and start embellishing! The cherry trees were die-cut on Curious Metallic - Chocolate card stock. 


I hope you like this scrapbook project. It's fun to scrapbook now I can't wait to make another one soon! You have a wonderful day!

CutCardStock Products Used:


Downtown Abby Card Kit

Monday, March 21, 2016
Hi all! I'm back today with a card created using Downtown Abbey Card Kit by Crafter's Companion. This kit is now available on HSN, click on the link to find out more information. This card kit is great when you need some quick and easy cards, they are easily put together and since it's a kit most of the embellishments coordinate with the cards beautifully.  

Everything you need is in this kit, including a tape runner and pop-up dots adhesive sheet that you need to put together the cards and embellishments. How convenient?! You will also find paper inserts for this kit, so you don't need to prepare blank paper for your sentiment. 


I hope you like this card! I'll be back to share more cards that you can create with this Downtown Abbey card kit! Happy creating!

Wedding Invitation using New Edge'ables Die!

Wednesday, March 16, 2016
Have you heard?!! Many new Crafter's Companion products are being launched today on HSN! Tune in to HSN to watch all the great deals! You will only get them at reduced price today so, don't miss it!


Here is one of the project created using one of the newly released dies by Crafter's Companion! And they are many more to see, including one of my favorites coloring tools the Spectrum Noir AquaBlend Watercolor pencils! 

The tutorial to create this beautiful wedding invitation card is available on Crafter's Companion blog


Celebrate In Style Handbag Giftbox

Monday, March 14, 2016
Popping in to share this gift box project idea with you today! I created this for Crafter's Companion, using their soon-to-be released Spectrum Noir AquaBlend Pencils to color the front panel for the gift "bag" below. The Only Word die is perfect for this idea which says "Celebrate in STYLE", don't you think?! (My sister told me my design is so retro, I honestly didn't think I'm that old! lol)

These items are going to be on HSN this coming 16th of March, be sure to tune in to watch all these amazing products on air!

Supplies:


 I applied Velcro on the cover of the bag.

Use brads to connect the handle makes it flexible to move the handle back and forth. It might not be strong enough to hold heavy things because it it's a card stock bag, it's not meant for heavy-duty use! 

I hope you enjoy this project, don't forget HSN on the 16th! You'll want to miss the debut of new products and great deals! :)

See you soon! xx

Wedding Place Cards

Friday, March 11, 2016
Hello all crafty friends! I'm back today with a wedding place card project created using Cut 'n' Boss. I just love how the machine make this task so easy and quick and yet retain the elegance of the project. 


Project supplies:
- Silver Glitter Card Stock
- Gold Foil Card Stock
- Intricate Heart Metal Die

Directions:

Step 1: Prepare the cut-outs using Cut 'n' Boss and appropriate metal die for the theme.

Step 2: Print names on white card stocks.

Step 3: Adhere the printed names on the cut-outs.

Step 4: Score and trim gold foil card stock and adhere the result from Step 3 above onto it.

Here is how it looks like, I hope you like the project. 

Happy Creating!

Woven Easter Basket (SVG provided)

Tuesday, March 8, 2016
Hi all! I'm glad to be back to CutCardStock design team to share more creations with you. This is my first post for the new term and since Easter is approaching, I made this woven Easter basket to share with you! I created this with my Cameo and I have also prepared the svg file for you if you are interested in making these. (Please download the file at end of this post).


Directions: 
Step 1: Download svg file and prepare the cut-outs. 

You will need to make more than one cut with different color card stocks.

Step 2: Follow each step in the picture below to make the basket. First start with preparing all the necessary supplies, in this case the base for the basket and strips of card stocks. Second, insert the card stock strip horizontally into the pre-cut vertical line on the base just like weaving a basket (cut the excess card stock strip). Third, glue shut the loose ends. Finally, apply double-sided adhesives on all tabs.


Step 3: Fold and glue the excess card stock on shorter sides (the width) of the basket. Assemble the basket by connecting all the tabs together.

Step 3: To make the handle for the basket, insert one of the card stock strip behind the woven pattern, such as shown below. Then do the same with the other end of card stock strip but the insert will be inside the box instead.

Here is the completed basket. If you prefer, apply ribbon around the handle and fancy or lace trims around the basket, such as shown in second picture below.

Completed baskets!


I hope you enjoy the tutorial and decide to make one of these. Happy Creating!

Download Svg File: Woven Easter Basket

CutCardStock Supplies:


Spectrum Noir AquaBlend - Coming Soon!

Friday, March 4, 2016
Have you heard about the NEW Spectrum Noir AquaBlend Watercolor Pencils by Crafter's Companion? It's coming soon! Make sure to watch HSN on the 16th to find out more about these amazing water coloring pencils! Not only that, Sara Davies will also be sharing lots of new products on HSN on this day too. Set your clock now so you won't miss it! 

Here is one of the cards I made with it:


More project inspirations coming up! Can't wait to show you what else I have created!! Thank you for sticking around to find out more. I hope you have a fabulous weekend! Hugs~

Supplies used for this card:
- New Spectrum Noir AquaBlend Watercolor Pencils (more details on HSN on the 16th)
Sheena's A Little Bit Scenic - Provence
- Edge'ables Only Word (On Your Special Day)

Auto Post Signature

Auto Post  Signature