Top Social

Picture Life

with embellishments...and rain drops!

Image Slider

Quick Quotes Blog
Showing posts with label Home Decor. Show all posts

Luminary Box For Creativation Last Week

Monday, January 29, 2018
Creativation was over last week and I wish I could be there with other of "my" (crafty) people. Often not many people gets why we do what we do, only we who enjoy it truly understand the joy it offers. Most of them time our hobby is perceived as time-wasting but to us it's actually fulling, therapeutic, aspiring in our life. Anyway, hope someday I'd be able to reunite with all crafty people out there!

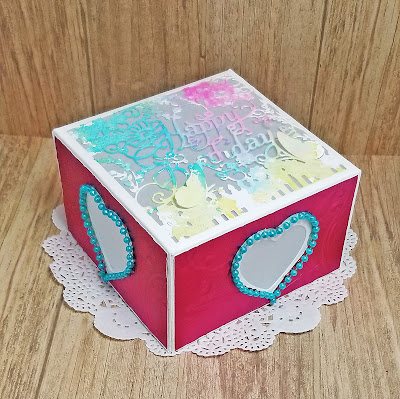
I made this luminary box for the convention, which you could probably see it in some pictures posted on Crafter's Companion FB. I hot glued a tea light to the bottom of the box leaving the switch on the outside so it can be turned on and off easily. The pattern on the top was colored with Spectrum Noir Aqua Markers (one of the best watercolor markers ever!). 


DIY Stylist Tree Home Decor/Ornament

Monday, October 16, 2017
What's the project inspiration for today? Make this cute holidays decoration using recycled items and cutting dies by Crafter's Companion! Doesn't this look adorable? If you haven't noticed, there's a jingle bell inside the tree itself! How cool is that?! No doubt I would hang this on my Christmas tree, that's right it makes a super adorable ornament too. :)

I used the Stylist Tree die from the Contemporary Collection from Crafter's Companion, I love the modern design of the tree unlike the traditional ones. Don't get me wrong, I love all Christmas trees only that this one is a little special. I used a plastic cup, you can use any cup you like to DIY this but make sure the proportion of the tree and cup looks nice together. I folded the falling snow acetate into a pyramid shape and decorated it with the cutout stylist tree which I colored with gold Sparkle Pen. 


Supplies:
- New Spectrum Noir Sparkle Markers (Icy Blue, Spun Gold)
- Contemporary Christmas Dies (Stylist Tree, Merry Christmas Sentiment)
- Crafter's Companion Luxury Cardstock (Glittered Gold)
- Crafter's Companion Watercolour Cardstock
- Stick-It Adhesive Sheet
- Crafter's Companion Big Score Board
- Gemini Machine

Others:
- Mini bow
- Hot Glue Gun
- Acryclic Sheet
- Plastic Cup
- Silver Glitter
- Adhesive Foam Sheet

3D Christmas Decor House

Thursday, October 5, 2017
Here is a flash back of one of the projects that I made that was on Crafter's Companion's last HSN in October! Had so much fun making this 3D decor house filled with Christmas characters. You can still find these fun characters dies on HSN! This Cute Christmas collection is so popular and I can say it's one of my favorite collections ever! 

Honestly it took me awhile to construct this decor house but it was really satisfying to see the final project came out nicely when it's done. I sent this in for HSN show which mean I can't use it decorate my house this Christmas (even so it was pretty cool to see it on TV!!). 


Supplies:

Sara Davies Signature Black & Gold Collection

Saturday, September 30, 2017
Black and Gold, it's one of the best combination of colors ever (in my opinion). The crafting expert Sara Davies (also the mastermind behind Crafter's Companion) came up with this collection Black & Gold and I think it's a fabulous idea! The patterned papers look good for making elegant project like one I did below. A home decor frame that will fit in any room perfectly. I'm thinking kitchen, bedroom, living room and even rest room (I'm not joking!). I think it will light up the room or at least gives it a completely different modern look. 

Sara is bringing this collection to HSN this coming October 3rd (which is next Tuesday!) so make sure to set your alarm clock and watch Sara and Jennifer demonstrate the entire collection with you! There will be plenty more projects to get you inspired! And spoiler alert, they will also be giveaways (many giveaways) on the day as well. Don't miss it, follow all design team members on their social media (click HERE to follow me on Instagram!) to catch all the news and freebies!


Check out Crafter's Companion's Blog to see more details about the upcoming show including information about what other products will be on air that day! Can't wait to see you there!

Block Letterings For Wedding Decor and Flower Quilling

Friday, June 23, 2017
Made this 7" block letterings for wedding decor using Crafter's Companion construction cardstock! Yep! The cardstock is thick and is meant for making boxes and project such as this, it's sturdy and easy to construct. The flower embellishments are made using the brand new flower quilling die that will soon coming to HSN!! They are more quilling dies that are coming to HSN this July 11th and trust me, you don't want to miss it! 


Supplies:
- Crafter's Companion Construction Cardstock
- Die'sire Quilling Flower Die (Sweet William)
- Crafter's Companion Quilling Paper
- Big Score Board
- Gemini Die-Cutting / Embossing Machine

Others:
- Hot Glue Gun

Love In Bloom Stackable Photo Cube

Saturday, January 28, 2017
Hi all! I'm back! Do you know today is the Lunar New Year? It's the year of Rooster this year! I supposed to be cooking and feasting with the family yesterday on the eve day but unfortunately the kids and husband are not feeling good so the plan cancelled. We ended up eating takeout pizza but no one complained. LOL. I had nothing to complain since I didn't have to cook and clean anything. ***grin*** The sad feeling flooded in when I started scrolling down my Facebook wall and seeing all the Chinese New Year posts/pictures shared by my friends and family from the other side of the world makes my heart sours a bit..ok maybe a lot. Lol. Anyway, I usually feel better after the first day of CNY which is TODAY, so I'm counting down for few more hours and I will be better. 

Sharing with you today is a project I created for Valentine's day. I used my kids pictures for this project because I really don't take much pictures these days especially decent looking one with nice/beautiful background. My family and I went to take the fall family pictures by the lake with a professional photographer but we haven't get the pictures yet so I don't know how well the pictures look. Wish to get them soon!! 

So this stackable photo cube allows you to pull out the bottom cube, reveal the secret word "LOVE" and stack it on the top. I think it looks nice for a home decor, what do you think?


Supplies:

- Crafter's Companion Construction Cardstock
- Diesire Mixed Media Dies (Contemporary Hearts)
- Sara Signature Love and Romance 6x6 Paper Pad
- Shimmering Cardstock 8 x 11.5" (Candy Red)
- Big Score Board
- Gemini Machine

Happy New Year 2017!!

Sunday, January 1, 2017
Hope you had a fabulous Christmas celebration and Happy New Year!!What's your resolution this year?! Mine is to make more craft projects this year and to lose some weight (had too much to eat during Christmas and New Year celebration). Hehe. The project I'm sharing today is created using Crafter's Companion dies and papers, for detailed list of supplies check the end of post!

This isn't just any regular banner because I added shaker element to it! So it's good to be looked at and to have some fun! I'm a big fan of gold so you probably see a lot of my projects are covered in gold. lol. Lately I have been foiling using Heidi Swapp Minc Machine, don't forget to check back to see what I create! Hint: Chinese New Year is around the corner! :) 


Supplies List: 
  • Just For Men Metal Dies (Superstars) 
  • Gemini Die-cutting/Embossing Machine 
  • Die'sire Essentials Metal Dies (Circles) 
  • Edge'ables Border Die (Stars) 
Other Supplies: 
  • Gold Foil Cardstock 
  • Numeral Foam Stickers 
  • Foam Sheets 
  • Twine 
  • Star Sequins 
  • Hot Glue Gun

DIY Christmas Ornament

Thursday, December 22, 2016
Check out this DIY ornament I created using oatmeal container! Reuse and up-cycle unused items into something new. Not only it's cost effective but also environment friendly! Very festive for the season. You can personalize it by putting something different in the center on the container, such as pictures and other memorabilia items. 

Usually the oatmeal container is pretty tall, I cut it down to about 1 1/4" wide and use the original cover as the base. Add mini ornaments by punching two small holes on the side of the container and string twine and ornaments through. Then glue the clear acetate to the back of the opening and you get this! Don't forget to decorate the background with patterned papers if desired. 


Supplies:


Others:
- Hot Glue Gun
- Twine
- Mini Ornaments
- Clear Acetate
- Oatmeal Container

Wall Frame Home Decor with Stencil

Tuesday, December 6, 2016
Ever thought of making a wall frame home decor using stencil and texture paste? Create not just colorful but also dimensional wall art using these amazing stencils by Sheena Douglass from Crafter's Companion! The stencils come in few different design and can be used on cards, DIY, mixed media projects and so much more. Especially for those who are into the retro feel, this Groovin' 60's crafting range is the pick! Check out link below for more information. 


Supplies:
Spectrum Noir Sparkle

Others:
- 10" x 18" Wall Frame
- Tim Holtz Texture Paste

Colorista Background Stamps!

Tuesday, August 2, 2016
Calling all lovely Coloristas! See what's coming to Crafter's Companion next friday?! Brand new Colorista background stamps are coming your way! See how cute this frame is made with one of the background stamps, want to see more?! Follow Crafter's Companion on FB to catch up with all the latest news and products updates! 

This home decor frame is just one of many ways you can create with the background stamps, check out Crafter's Companion pinterest board for more project ideas! I colored this image with AquaBlend color pencils and I think they look fabulous, what do you think? The yellow, pink and blue seem to be a great combination of color. 


Supplies:
- Colorista Beautiful Butterfly Stamps
- Spectrum Noir AquaBlend Pencils
- Sentimentals EZMount Stamp Set - Memories are made
- Sheena Douglass EZMount Stamp Set Perfect Partners - Lily
- Crafter's Companion Watercolour Cardstock
- Heat Resistant Acetate

Other Supplies:
- 8 x 10 Frame
- Gold and Black Embossing Powder

Just For Men - Home Decor For Dad

Saturday, June 11, 2016
Looking for crafting for men supplies? Crafter's Companion has it in store for you now! Finding supplies to create for men has not always been easy for me but Crafter's Companion has recently released these men related craft stamps, dies, even designer papers to help with the struggle! 

I created this home decor frame for dad using the gorgeous dies and stamps from the collection "Just For Men", visit Crafter's Companion website and navigate to this category to see all the products available. I have a feeling you are going to fall in love with this new collection!


This can be a gift for dad's birthday and father's day especially for a dad that doesn't have much material interest. Create something with love is the biggest gift! 


Supplies: 


Other supplies:
- Chipboard
- Hot Glue
- Spray Glue
- Clear Acetate (reused CC embossing folder packaging)


They are more from this collection but you will have to check them out yourself. :) Hint: the embossing folders are awesome too!! 

All About Dad Home Decor - Free SVG Download

Tuesday, May 3, 2016

Hi all! I'm back today with a simple project for Father's day - it's a home decor frame with all things about dad. I love my dad very much although we didn't spend enough time together (he passed away when I was 14) but I always remember his love for all of his children, so kind, generous and unconditional. As much as I wish I could spend more time with him, I will forever treasure the memory I have of him in my heart. 

I created this with my Cameo and Silhouette Design Studio. Check the end of post to download the svg file. However, the file I share with you is slightly different since I purchased the 'father and son' cut file from Silhouette Online Store, I'm not allowed to distribute the image due to licensing restrictions. But you can purchase from HERE if you are interested in the same design. 

Directions:
Step 1: Download the svg file at the bottom of post, adjust image size to fit your picture frame and cut the the image with your Cameo.

NOTE: The shared SVG file will look like below, without 'father and son' image.


Step 2: If you purchased the same 'father and son' image from Silhouette Online Store, you can cut the image out and apply on the 'all about dad' wording cut file.
                             

Step 3: Trim a light brown card stock to the size of your frame. Adhere both cut-outs together on a BASIS light brown card stock. 


That's it! As easy as 1-2-3 and you have a cool looking home decor. You can use this as a gift for Father's day or your dad's birthday! I hope you enjoy this simple project I'm sharing this week!

Have a wonderful week! 


Supplies:

Forever Yours Shadow Box

Thursday, April 28, 2016
Sheena's Day Of The Dead collection is on Crafter's Companion online store now! Check them out HERE! These are great for Halloween crafting (it's definitely not too early to get them because they are so super cute!). 

I made this shadow box with the Forever Yours stamp set... more details on the products used at the end of post. Tutorial for this project is coming soon!


Supplies:
- Sheena Perfect Partners Day of The Dead Stamp Set (Forever Yours)
- Edge'ables Fancy Die (Renaissance)
- Die'sire Classique Only Words 1" Alphapet Dies (Lowercase)
- Bebunni Floral Metal Die (Cabbage Rose Die)
- Spectrum Noir Markers (True Black, IG10, IG8, IG6, IG4, DR7, DR5, CR11, CR8, DG3, FS3, FS2, TN2)
- The Big Score Board
Other Supplies:
- Trims
- Pearl Beads

Garden Shed Gift House

Wednesday, April 20, 2016
I knew saving the ginger bread house packaging from last Christmas was a good idea! I turned it into this garden shed gift box. if you have a friend who's into gardening this is one perfect gift for him/her. Load it up with plant seeds and ready to go! 

Check out the tutorial for this gift house on Crafter's Companion website!


Supplies:
- Edge'ables Fancy Borders - Floral Dance

Other Supplies:
- Craft Knife
- Patterned Papers
- Heavy Card Stocks
- Card Board
- Heart-Shape Felt Trim
- Charm
- Scoring Board

Chinese New Year Banner with Tutorial!

Friday, January 15, 2016
Hello! I don't know how many of you celebrate Chinese New Year but I'm for one very looking forward to this day. It's the year of Monkey and this year it falls on the 8th of February (yep, it's different each year depending on the lunar calendar). When I was young the celebration was huge, everyone would come home for the Chinese New Year Eve dinner - reunion dinner. But ever since I got married (especially when I'm so far away from home) I don't feel that kind of excitement anymore. There is no "reunion dinner" because I will not be around my mom and siblings. 

However, this year I want to change it up a little bit, I want my children to know what part of their culture is - being half Chinese. So we will be taking them to see the parade this year (if the weather permits!) and get involved in other CNY activities. My first project was to create this banner so I can decorate the living room, bring on the festivity! The characters "万事如意" means: Wish you the best of everything or hope everything goes your way. 


Supplies:
Craftwell Cut 'n' Boss Machine
- Laser Printer
- Laminator / MINC Machine
- Four 8 x 6 red card stocks
- Four 8 x 5.5" patterned card stocks 
- White card stocks (for making the doilies)
- Gold Foil Transfer Sheet
- Doilies Die
- Circle Die 
- Flower Embossing Folder
- Red Ribbon
- Bows

Step 1: Use your laser printer,print the Chinese characters on a red card stock (make sure to leave some space between each characters). Please see attachments for template.


Step 2: Cut squares of gold foil and layer it on top of each characters, make sure to cover the entire print area. If you prefer, secure the gold foil with a piece of tape to keep it in place. 


Insert the red card stock with goil foil (one at a time) into a folded A4 paper (like a sandwich!)

Step 3: Run the A4 sandwich through the laminator.


Here is what you will get...sparkly! Remember to cut each character out in circle shape (use circle die if you have one!)


Step 4: Make the doilies die-cuts with Cut 'n' Boss and emboss the patterned papers

Step 5: Adhere the embossed patterned papers on top of the red card stocks, then cut fish tail shape on each of them.

Step 5: Adhere the characters to the doilies. Then apply double-sided foam tapes on the back of the doilies and adhere it to the patterned paper. Finally, punch holes on the each banner piece and string the ribbon through the punched holes. 

That's it! I hope you like the project! 


Auto Post Signature

Auto Post  Signature